Wednesday, August 31, 2011

Wednesday Highlights


You ladies are too fantastic! Do you have any idea how hard it is to narrow down highlights from the weekly parties? So hard. Here are a few I love this week.


Fall decor is starting to show up and I'm so excited about it! Gather all those fall materials and make some pretty crafts like this fall wreath at Love Laugh Create.


Naptime Crafters built this amazing play kitchen with running water! My kids would have WAY TOO MUCH fun with this in their playroom!


This tutu lamp would be a dashing addition to a girl's room or anywhere to do with dancers. Apothecary Home made it so frilly and beautiful.


Add a little touch of whimsy to a couch, chairs or a bed by adding some fun his and hers pillows! See these at Let's Make This Pretty.


The fancy stitching on pants is quite the rage. You can make pants that are rockstar worthy by doing what I Am Momma, Hear Me Roar did.


Stencils are being used on so many things right now including clothing. Brassy Apple stenciled a skirt to make it super fabulous.


Another thing you can stencil is the tops of table and benches. This one by Tattered and Inked looks so spectacular.


See more Whatever Goes Wednesday links.


Whatever Goes Wednesday #81


***


Sorry I'm getting this up late! I went to an out-of-town blogger get together last night and got home late! It was nice to meet a lot of bloggers I only know on the computer!


***


Welcome to this crazy day of linky love and blog exploration! I love to see what is new out there in blog land. Get started clicking away to view everyone's creations!


Please stick around and click on at few a links before leaving. Don't be a link-and-run blogger!


NEW SPONSOR


Our new sponsor is Dupree Designs. Miranda sells these darling newborn gift baskets at too inexpensive a price. These are great for shower and baby gifts She gave one to me when Remington was born!


Check out Dupree Designs.


MOST VIEWED LINK LAST WEEK!


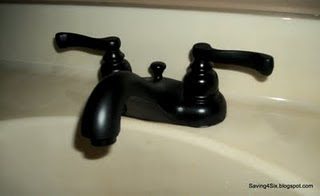
Everyone wanted to find out what six objects Saving for Six sprayed at her house. One of them was this sink faucet. You will have to go visit this spray paint post to see the other five!


BLOG TIPS

This week's tip by Seven Thirty Three - A Creative Blog.


HOW TO: Add A "Pin It" Button To Your Post


Because you are probably addicted to Pinterest, you want to pin everything you see. You also want other people to pin ideas from your blog. Seven Thirty Three makes it east to show the Pin It button with this tutorial.


CRAFTING FOR A CAUSE


Crafting for a Cause


The Crafting For A Cause this month involves sewing cloth/reusuable feminine pads for girls in third world countries who don't have any!!!! Can you imagine? Seriously, get involved in this one!!! Learn more at Ladybird Ln.


I'm looking for ideas for the next Categorically Crafting party? Do you have any?


You know what to do. Enter your project (up to 4 links), tip, idea, recipe, whatever. Visit others. Leave comments. PLEASE NO ETSY SHOPS! Come back again in the next few days more projects are added throughout the week. Let the fun begin! (Because blogging is not my full-time job, I will not be able to visit every link. I apologize.)


Tuesday, August 30, 2011

A Freakin' Fantastic Nursery For A BOY!!!

I am LOVING this little boy nursery. Everything about it is clean, fresh, fun and inventive! Check out that alphabet wall, the chevron shelves (that's what I want to call them) and the bright colored fabrics and paint.


I'm also loving the idea of embroidery hoops that look like balls. See that one that looks like a baseball. You could also make on of a basketball, tennis ball, bowling ball, etc. What a great idea for boys! This room was created by Hope, Longing, Life (and is guest posting it at Hyphen Interiors - one of my new favorite blogs.)


My Two Month Old Baby!!!!! And Newborn Pictures with Pristine Photo!


I sitting here in shock because I took Remington to his 2-month appt. today!  My tiny, precious newborn is two months old!!!!  He's as healthy as a horse and gaining a lot of weight (12 lbs. 6 oz).   I'm grateful for a healthy baby who is so so so easy going and good.  That makes life much easier.  He loves to be held and wants to be around people (especially me)!   I'm in love!  

We will be blessing Remington in our church in Sunday.  I'm excited to see him in his dapper white tuxedo.  I'll have to post some pictures next week!  

I realize that I never have posted his adorable infant pictures.   My friend, Tina, of Pristine Photo took them!  I think they turned out great!

This is my favorite picture.   Cooper, my three year old, loves tractors and trucks.  I grabbed this Tonka on the way out the door as we were going to the photo shoot.   I was hoping he would fit in the back!  He DID!  Barely!!!


Tina bought this 100 year old baby buggy a few days before the photo shoot!  It is a great prop!   We got so many cute ones of Remington in the buggy.   Most of them are up closer, but I just had to have one of the entire buggy!  


I learned quite a few photography tricks while Tina shot the photos.   I love head shots of babies resting on their hands!   What a handsome boy!


My kids' favorite photo was when Remington decided to pee right after this shot.   Let's just say he sprung a major leak up in the air and Tina caught it on camera!  So funny!

I got 30 awesome pictures of Baby Remington!  You can see a few more HERE.  I'm grateful for the 2 hours that Pristine Photo took capturing the perfect poses of my precious 8-day-old baby!   With my first two kids, I just got the 30-minute session at JC Penney.  While I liked the pictures, I really wish I would have gotten some amazing pictures like these!   I love Pristine Photo and highly recommend Tina for any and all your photography needs! 


Here is Cooper and Remington and Cadence now!   At two months, Remington is alert, interacting, starting to smile and coo, and the center of our universe!   We love having a baby at our house.  


He is such a sweet little monkey!   We love you, Remington!


AND A LAST REMINDER:

More Devastation.

Hurricane Irene.

Red Cross is there to HELP.

Thank YOU!

We can ALL feel a little better knowing we are donating to a cause that can help!!!

Where we can't be there to help, we can donate to the Red Cross so they can be.

Tomorrow

Wednesday August 31st is the

LAST day

to order the recipe book!

$10.00
100% going to Red Cross
Beautiful Recipe Book in exchange for your donation.
No Brainer if you ask me.

This all started because of the devastation we saw in Japan and feeling like there was nothing we could do to help.

We can help!

Every little donation adds up. Because of all of your $10.00 donations, so far we have raised over

$14,400!


We realize there has been some frustration with the process of buying the hard cover book. Paper Coterie usually prints photobooks that you make and not already finished products so the process to get to your cart can be a bit confusing.
Here are the steps to get a book to your cart…
https://www.papercoterie.com/promo/recipes-to-help/
click on the picture of the recipe book and then
click on create this book
login or create a login
then click preview
and then add to cart
verify
check out
Thanks for understanding and being patient. They are SO generous to do all this for free (for a good cause)!
here is the link to the big cartel store
http://recipestohelp.bigcartel.com/

THANKS!!!!!

Monday, August 29, 2011

Draped Circle Top (Nordstrom Knock-off)

Head over to Sweet Lemonayde to learn how easy it is to knock-off a draped circle top found at Nordstrom.    It is so cute and SO EASY!!!!   Can you believe this tutorial was written by and 8TH GRADER?    What will she be making when she is 20?   This girl has some serious talents.  Swing over to say "Hi" to Nay.


Guest Blogger - The Letter 4 - Muppets Puppet Theater


Oh ya! Let me just bask in the spotlight for a second, I can't believe I get to guest post on Someday Crafts! A huge thank you to Michelle for letting me take over her blog today! I feel so honored.


I am Jamie from The Letter 4. This little sister blog started 2 months ago and it has been a rush ever since. I decided it wasn't enough to brag about my sister's genius to all my friends, I convinced my sisters to start a blog with me so we could share all of our ideas with anyone who decided to stop by! I am not exaggerating when I say that there is literally something for everybody in this blog, and we're just getting started!
Janae is our amazing photographer and hairstyle guru. Her tutorial on a modern way of wearing a scarf in your hair was a huge hit!!


Jade is our chef. She is AMAZING! She did a whole white fight series on what you could use instead of white flour, white rice, ect. And these Quinoa Stuffed Peppers were a favorite!


I am our printables gal. I recently gave out an organized grocery list printable and even show you how to make your own notepad with them! Hello organization!


Julianna is our writer, she gives out some fun random facts and is just starting some great book reviews!
Now on to the tutorial of the day...


My family is kind of insanely obsessed with the Muppets. Maybe it's their witty comedy or maybe it's the fact that every family member correlates with one of the personalities of the Muppet's. Either way, they are the funniest things ever. My daughter has had a plush Kermit doll since she was born and is turning 1 in October and the theme was just too obvious. Muppets, of course!

 
I searched for hours for good ideas on a (girly) Muppet themed party. Really... there is nothing, so I have collaborated with Michelle from Our Wonderfilled Life (she does amazing idea boards for parties!) and we are putting together the best Muppet bash you could think of! Check out my daughters Muppet Theater!


I'm positive this is the most awesome thing I have ever made in my life. It's awesome for several reasons:

 
1. It goes perfectly for decor for her birthday theme.
2. It will also be one of her birthday gifts. I'm sure she will have fun with till she is 5+.
3. It's a perfect photo opp...I mean just look at this...


When I first got the idea, I thought, "there is no way I have time to make that." 3 days people. And all together it really only took me maybe 2 hours. If that. This is super simple.


1. Get yourself a cardboard box. Whatever size you think you can handle. Get the kiddos involved!
2. Slap on the paint. It will take a few layers.
3. Cut out a square in the middle for your stage area.
4. I took the cardboard cut out from step 3 and glued it right above the cut out area. Then I projected the words "Sabrina's Muppet theater" onto the box and painted it with metallic gold paint. I also painted just a few simple details like the gold pillars and the theater seats.
5. Add some cute details! I glued scrapbooking paper that looked like wood to the inside and hung some paper clouds from the top with thread.
6. Cut out a strip at the bottom to put your hands through to maneuver the puppets. I also cut a hole in the top so I could see what I was doing.
7. Break out some sock or felt puppets and put on a show!


OR! I have made these hilarious Muppet printables that you can cut out and tape to popsicle sticks that will be available to download on our blog in the next week or so! You will be able to download Kermit, Animal, Fozzie, Miss Piggy, Gonzo, and Beaker! If that doesn't convince you that you need to have a Muppet themed birthday party, I don't know what will! But if you still need convincing, I already have a Muppet invitation I have shared on our blog and I have many more Muppet themed ideas to come that I will share before my daughters birthday in October!

 
Hope you enjoyed our tutorial and thank you again to Michelle, you are so so sweet!


Thanks, The Letter 4 ladies.  Y'all are very talented.  I noticed your blog link-ups when you first started and thought, "This group is going to make it BIG."  And I still believe that The Letter 4 will be a blog in everyone's reader in the next few months.   This Muppet show idea is darling and that birthday party will be so fun!
Visit The Letter 4 ladies and leave them some love today!
 

Sunday, August 28, 2011

Wheat Wreath

The wheat fields around where I live are ready to harvest. And I'm tempted to grab a bunch for some awesome fall projects like this wheat wreath from Choose To Thrive. What other projects can you do with wheat?


See the wheat wreath.


Faux Beaded Chandelier

Can you guess what this faux chandelier is made from? Give up! Mark Montano made it from a tomato cage!!!! Isn't that fun and beautiful? This could be a great way to add some bling to a corner or a ceiling. I wonder what it would look like with a light in the center of this?


Saturday, August 27, 2011

Paint Your Furniture (2 Different Ways)

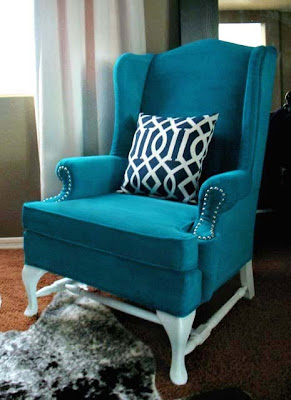
The vibrant color of this teal blue chair rocks! I wish I could find some awesome fabric like it OR I could just paint it this color like Hypen Interiors did! Yeah, she painted it with a brush and roller!


You are not going to believe this one either! This beautiful sofa used to be navy blue. Was it reupholstered? Nope! Johnny In A Dress spray painted it. Super cool!


Learn how to spray paint a sofa.


Washer Monograms, Washer Wall Art

There are so many uses for washers that you buy at the home improvement store. Add this washer monogram to the list. It's fabulous. I'll Get You My Pretties made some other interesting shapes and cool designs with washers for some great wall art.


(Found via Hyphen Interiors.)


Friday, August 26, 2011

Adding a Faux Transom and Hallway Arches (2)


Make the top of your doorways look super fancy by adding some faux transom. In My Own Style uses a couple of secrets to pull this awesome look off.


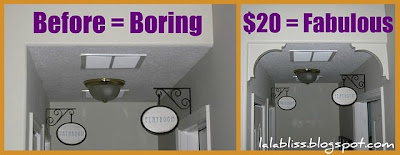
It is amazing what adding a few little architectural details (like these arches) can do for a room. This hall went from boring to beautiful by adding some pre-cut curvy arches. See this at La La Bliss.


Wednesday Party Highlights


I missed posting some party highlights this week because my computer was not cooperating! Here are a few lovely projects that I would love to see in my house or do!


I want a couple shelves filled with these Restoration Hardware industrial basket knock-offs at my house. I have quite a few shelves that would more stylish with these babies! Blissfully Ever After is the creator of these!


Have the style of Ballard Design without the high cost by building these cafe shelves by yourself. Great tutorial by That Village House.


I'm loving how A Little Tipsy glammed up her builder grade bathroom mirror by adding some frosting around the edges. (That sounds funny!) Pretty, Pretty frosted-edged mirror!


Check out these gorgeous skinny ruffled headbands at Flamingo Toes! So pretty and feminine.


I've never met a kid who didn't like to play in water with their hands. This water wall looks like so much fun! A Family That Birds Together has some happy children because of this contraption!


Thursday, August 25, 2011

Guest Blogger - Lolly jane - Address Subway Art


Hey Someday Crafts readers!


We are Kelli & Kristi of


Lolly Jane

and are just thrilled to be guesting here today!


We home decor projects and just about anything crafty! We showcase home improvement projects, craft tutorials, furniture & thrift store before/afters and sometimes a recipe or two :)


Take a peek at some of our latest projects:


Something else we love to do is take a cute idea and make it our own, like today's project, address subway art:


Ours is subway art with heart! ;)


These addresses represent all the places Kelli has lived... and the hearts are symbolic of where she lived as a newlywed {the first turquoise } and the following 4 represent each address she brought the baby home to. Awww!


If you want to make your own, follow these easy steps:


1. Board size: 11x22


2. Paint base color


3. Cut vinyl lettering & backwards weed


4. Apply transfer paper onto vinyl quote


5. Apply vinyl onto board, peel off transfer paper


6. Paint desired color of acrylic paint {we Plaid brand!}


7. Let paint dry completely


8. Peel off vinyl lettering


9. Touch up & sand edges


That's it!


Your very own personalized subway art with heart:


E-mail us at lollyjane@gmail.com for any questions or visit our FB here!


Hope you'll stop by our little corner of Blogland to say hello :)


Thanks ladies!!!! What a fun subway art to have in your home! I love the touch of blue! Visit Lolly Jane to see more amazing projects.