Showing posts with label fall. Show all posts

Monday, October 10, 2011

Acorn Faces Line-up!

With all the acorns laying around on the ground, there are many fun projects to do.   I'm thinking this one from Creative Outlets of a Thrifty Minded Momma would be fun for kids and adults to do.  Plus, it is a great conversation piece and a very whimsical piece of decor.  Aren't the acorn faces great?  You've got to read what they are saying!!!


Saturday, October 8, 2011

More Decoupaged Pumpkins

Check out some more of those decoupaged pumpkins!   I love the fabric that Love Sweet Love used!!!  So fun!  Are you going to decoupage any pumpkins this year?

Framed Witches Hat

Most people will frame a pumpkin at this time of year.   Not Honeybear Lane.  She framed some witches hats and a black feather wreath!   The witches hats are such a cute wall hanging, in front of the orange stripes.   LOVE this idea.

Friday, October 7, 2011

Crocheted or Doily Pumpkins

These crocheted covered pumpkins from Mitzi's Miscellany are stunning.  The vintage look would add a dramatic flare to any mantle or pumpkin/fall display!  I think this look could be achieved with some doilies!

Tuesday, October 4, 2011

Decopauged Chevron Pumpkins

If you are loving the chevron trend, check out these decopauged pumpkins from Tatertots and Jello. She took strips of striped fabic and made them into the chevron pattern around the pumpkins. Looks super trendy and modern!


Friday, September 30, 2011

Guest Blogger - My Lil' Pumpkin Patch - Fall Pumpkin Door Hanger


Hey all you Someday Crafts readers! My name is Stephanie and I blog at My Li'l Pumpkin Patch. I am thrilled to be guest blogging for Michelle today. I have been following her blog for quite a while and LOVE it! It is one of those blogs that I check daily, (or most likely, several times a day). Doesn't she have and share the greatest ideas?


I am going to show you how to make this super easy and cute fall door decor today.


But, before I get ahead of myself, let me introduce myself. I am a wife and a mother (to a sweet two-year old, Isaac). I enjoy creating things for my home, family, and others. I am pretty frugal and get a high from finding very inexpensive ways to create. Here are a few of my favorite projects to far:


When I'm not crafting, I enjoy spending time with my family. Some of our favorite things to do are camping, four-wheeling, and watching Netflix (recent fav: American Pickers).


Come visit me at my blog, My Li'l Pumpkin Patch to see my crafts, DIY projects, sewing, scrapbooking, card making, and tutorials! If you have a big craft stash like me, you may also be interested in joining my new "Stache Party." It is a party dedicated to depleting your stash, (AKA making room for more).


The Fall Doorknob Decor I am sharing with you today, I actually made it from things I had in my stash. :)


These are the supplies you will need. I had everything I needed on hand, but if you need any of the supplies, they are very inexpensive.


You will also need some cardstock and letter stickers. As you can tell, these are scraps and leftovers. :) Thank goodness I could spell out the word "fall," since they are almost gone! If you don't have stickers, you could cut out letters or even draw them on.


The first thing you'll need to do is cut a piece out of the hanger that is approximately 12" long. You will be bending it into the shape of a pumpkin.


I started bending at the stem. I used pliers at first, but then discovered it was easier to do the bending with my hands.


Next, I took some floral wire and began wrapping it around one of the raw edges of the stem section.


I wrapped the wire around a whole bunch of times and connected the two raw edges to make one continuous line. It doesn't have to be pretty, because this will be covered up in the end anyway. Just make sure the two ends are held together well.


Put a dab of hot glue on the wire and start wrapping your jute twine. I found it easier to cut a big piece of twine, instead of trying to fit the whole spool through the opening.


Just keep wrapping, wrapping, wrapping (I may have seen Nemo too many times...Isaac loves it). I hot glued every 1/2" OR when the twine started to slide. I also wrapped the twine loosely but pushed it close together so it was fatter to add some volume.


Next I cut out some pennants (can be done with Cricut, Silhouette, or by hand) and stuck my "fall" letters to them. I decided to make the black a little bit bigger to create a nice border.


I tied a bow and then glued in on to the bottom right corner to balance things out and add some more color.


I decided to use a piece of twine to hang this on the door knob. Just take a long piece and loop it through the stem of the pumpkin. It is better to make it too long than too short - you can always trim!


Tie the twine in a bow around the top of the doorknob.


Isn't it pretty? I think it adds such a fun touch. It is so simple and so easy!


I hope you will come visit me sometime!


Thanks for having me, Michelle!


Blogs like My Lil' Pumpkin Patch are some of my favorites because she shows simple, easy and cute ideas all the time. This is one of those projects! Visit My Lil' Pumpkin Patch and say "HI!"

Tuesday, September 27, 2011

Yarn Wrapped Gourds

Yesterday, I showed some amazing yarn pumpkins and today I have to show off these spectacular yarn-wrapped gourds!!!!!! I'm in awe of these! Look at the spirals on that pumpkin! And the colors and designs of the other gourds!!!! Wow! Two Shades of Pink walks you through how to make these fabulous fall decor items.


Monday, September 26, 2011

Scrappy Fall Tree Pillow

I love this scrappy fall pillow at Pickup Some Creativity. The fabrics she used look so good together and the stitching adds great detail. That would look so fun on a couch or a chair.


Sunday, September 25, 2011

Chickenwire Pumpkin

Craftberry Bush has come up with another pumpkin idea I've never seen before. This pumpkin was made using chickenwire!!! Totally cute and totally creative! I also love her wheat stalks made from twine! I wish my brain was creative enough to come up with great ideas like these.


Fall Projects Galore with Point of View


It's time for the monthly Point of View from six talented blogger! I love it when bloggers get together to do collaborations like these. The theme this month is FALL and there are some awesome projects to check out!


Easy ruffled leaf headband from Camilla at Rosy Red Buttons


Awesome silhouette art from Leanne at Organize and Decorate Everything


Beautiful candy apples from Michelle at A Little Tipsy


So cute beadboard pumpkins from Amy at Ameroonie Designs


A fall porch design from Jonie at Just Between Friends


Darling wall decor from Stephanie at Always Just a Mom


Delicious and beautiful cookies at Gwenny Penny


Saturday, September 24, 2011

Basket Pumpkins

I love it when I see and idea I've never seen before.


Baby Berry showed off these original pumpkins made from baskets at the Fall linky and I thought they were pretty darn cool! I bet you think the same thing too!


Plush Candy Corns


Wow! That Fall linky party is absolutely rocking! If you haven't checked out the AMAZING ideas there, you must keep scrolling down. I seriously could highlight every one of them!!!! Y'all are crazy talented!


I think there is something so endearing about candy corns! They are just fun to look at! I'm loving these plush candy corns at Sweet Bee Buzzing. The different materials and types of fabrics used makes for a festive basket of candy corns.


Friday, September 23, 2011

Fall Mantle with LOTS of Goodies!

There is so much Fall goodness in this mantle at Tattered & Inked! So mant projects at which to look. Glitter pumpkins, glitter wreath, glitter wood gourds, fall bunting, wood sign, thumb tack monogram and MORE!!! All the glitter ideas are using glitter spray paint! This post connects you to all the tutorials!


FALL Linky!

Welcome to the


FALL


Categorically Crafting Show


where you can show off all of your fun projects featuring


FALL CRAFTS, DECOR, FOODS AND IDEAS!


To see a bunch of FALL ideas, you can click FALL LABEL HERE.


Please join your crafty post if, and only if, it corresponds with the category and theme of FALL. (If it doesn't fit in this category, please link it up to Whatever Goes Wednesday.) Link up crafts, decor, sewing projects, food, tips, etc, that has to do with FALL. If you have joined a FALL project to a party on my blog before, feel free to add it to this show too! If you have a lot of FALL projects, please choose your favorites. (Please no more than 4 posts per blog). Link to the specific posts, not to your main blog page.

Let's see what you have created (either recently or in the past)!


This linky will be open until THROUGH THE MIDDLE OF OCT. so keep checking back!


You can paste the "Categorically Crafting" button onto your blog post. I would love to see these floating around so more people can post their themed projects. I will leave this linky post open until next CC Show. Keep checking back for more ideas!!!


Wednesday, September 21, 2011

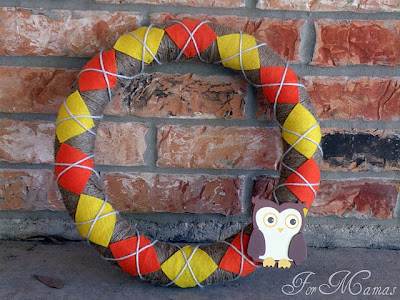
Argyle Wreath


I'm having a busy night and week. I'm just now looking at the party for the day. This wreath stood out to me.


Anything argyle is cool. I never would have thought to make an argyle wreath. I think is looks totally fabulous - especially with the fall colors. For Mamas designed this.


Sunday, September 18, 2011

Sweater Pumpkins

Take an old, stretched out sweater and turn it into a Fall pumpkin with some great texture! A bunch of these would look so cute as a vignette. Rustic Crafts tells you how to make one.


Friday, September 16, 2011

Velvet Pumpkins


I saw velvet pumpkins last year (the bottom picture) and fell in love. I had to highlight them again because they are so rich and beautiful! My favorite thing about both of these pictures (besides the velvet) is the real pumpkin stems! It combines whimsy and reality! DIY Craft Projects has a tutorial for these babies.


Learn how to make velvet pumpkins.

Thursday, September 15, 2011

Framed Fall Sign

Joy In The Jumble shows you how to make a quick, cute and easy sign to decorate your house for Fall. It is so easy to skip right to Halloween decor, but this Fall sign would be a great addition for September and October decorating.


See the DIY Fall Sign.

Tuesday, September 13, 2011

Fall Lentil Frames

I've never thought about using lentils to make some gorgeous picture frames, but Choose To Thrive did and they look AWESOME! The colors of the lentils are perfect fall colors. One other cool thing about these frames, they are made from cardboard. Inexpensive projects rock!


Monday, September 12, 2011

Guest Blogger - Crafty Blonde Chick - 2x4 Candy Corn


I am so excited to be a guest blogger on Someday Crafts! I am Tricia from


I have enjoyed starting a blog about my crafting hobby and want to give a huge thank you to Michelle for asking me to guest on her blog!


I am going to be showing you how to make some 2x4 Candy Corn. These are simple to make and make use of scrap pieces of wood. If any of you have a husband that likes to do projects, then you probably have an abundance of scrap wood like I do.


Supplies needed:
2x4 wood
yellow, orange, and white paint
sandpaper
Chop Saw or handsaw
hemp twine or ribbon

Start out by cutting your wood using the chop saw at a 15 degree angle. I cut it once and then flipped it around so I didn't have to adjust the angle again. Make sure to leave a little of the flat edge on top to resemble the real candy corn.


Your candy corn should look like this now:


Next sand the edges and get ready to paint! I use painters tape and do a stripe down the middle so I can paint the top and bottom of each in the same step. Make sure to do the top and bottom and all sides!


When paint is dry you can pull the tape off and have a straight edge to paint the last color in.


Last but not least, when the painting is completed, sand the edges and distress the candy corn. I added some hemp twine around the middle candy corn to add something extra. Halloween or fall ribbon would look darling too.


Put them on a shelf or table and enjoy your new halloween/fall decorations! They really are that simple!

Thanks again to Michelle and come check out


for more crafts that I have done.

Thanks,
Tricia @ craftyblondechick.blogspot.com


Thank you Tricia. I love finding new bloggers with some great ideas and this definitely qualifies for that! This is one craft that fits in the "quick, easy and inexpensive" catagory that I love. Head over to Crafty Blonde Chick and welcome her to blog land!