Showing posts with label bag. Show all posts

Tuesday, October 11, 2011

Thirty-One Bags $25 Giveaway (And story about my vacation!)

As you may remember, I recently went on a trip to Louisiana.  For the most part, it was very enjoyable!  I ate a ton of great food and had fun with relatives!   There were a few things that put a damper on our trip and one of them happened to be my purse!   Yes, I am in need of a new purse because the one I have had for ages broke.  The strap died and I almost lost it.   

A few hours before our plane was to leave back to Utah, I couldn't find my purse with my photo ID!    It's a longer story than I care to tell, but we found it, rushed to the airport and made it home as planned.   BUT after that panicking experience and our little campout (our family of 5 spent a sleepless night on the hard floor of the Houston airport due to a lovely storm), I came to realize that quality BAGS are an important part of life!

In honor of my nerve-wracking experiences, I introduce Thirty-One Gifts.  Thirty-One Gifts is a direct sales company that provides people with bags, purses, baskets, organizational supplies and more!

A kind Thirty-One consultant named Shannah Coe let me go shopping in her virtual catalog to see how she could help make my life easier and less stressful.   I found A LOT of items I wanted and many that I needed.  Here are just a few!
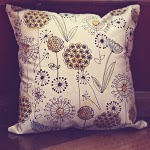
How cute and feminine is this ruffle mini zipper pouch?   I want....3! 


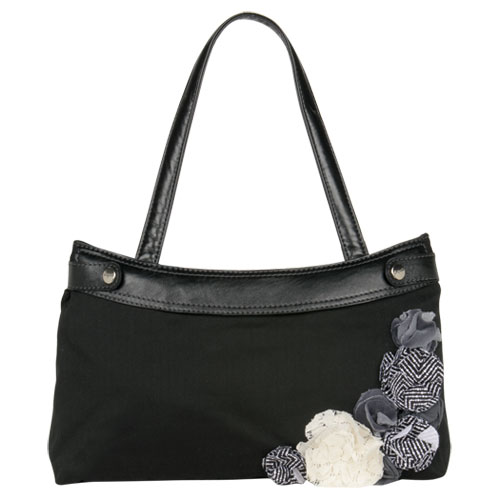
This sleek and elite skirt purse looks so sophisticated.

You know what is cool about this fitted dark denim purse?  It is the same purse as the previous purse only swapped out with a different "skirt" for a more casual look.  Change the look of your purse with a few snaps!  I love creativity like that.   You don't have to keep emptying the contents of your purse.  You just change the outer shell!  
You are probably wondering what kind of "bag lady" I am.  Well, I am a crossover lady.  I need both hands free to chase the kiddos wherever we go.   This crossover bag rocks because it zips open at the bottom to free up more space for all our "necessities."   This would be MY bag/purse of choice!
Need some thermal totes for camping, picnics, school lunch or work?   Thirty-One carries a ton of different styles and fabrics.


Not only does Thirty-One Gifts carry bags, they offer great collapsible storage cube for home organization.  (Does that mean it will automatically organize my home or guarantee that my kids will put their toys in it?  If so, I need 50 of these!!!)

This basket would be great for a cute way to store magazines, mail, hand towels or toilet paper rolls.  It would definitely make my bathroom look more beautiful and function better.
 
I could go on and on!!!!!

Shannah is also very kind in letting YOU get in on shopping.   She is giving away a  $25 gift certificate
towards any item(s) from her catalog!  She is going to solve your bag problems too!  

 If you are like me, you never win anything.  So to all of us UNLUCKY people, she is offering
10% off to anyone who emails her with a purchase.  

Additionally, the current customer bonus is a $25 organizing utility tote for only $7 when a you spends $31 or more.

So, let's get shopping with Shannah and make our lives easier! 

Giveaway
To Enter: (leave a comment for each one)
1.  Visit Thirty-One Gifts and leave a comment here about how you would spend the $25.
2.  Blog, Tweet, or Facebook about this giveaway.

Winner to be announced next Tuesday.

Monday, August 15, 2011

Guest Blogger - The Crafty CPA - Men's Shirt Messenger Bag!


the crafty cpa


I'm happy to be guest posting today from the crafty cpa.


I'm Megan, a working wife and mom to two adorable and slightly naughty golden retrievers. My personal mission statement is "create something new everyday". I might create a project, a tutorial, a photograph, an idea, inspiration, or anything really. My mission is about doing new things and challenging myself on a daily basis.


I like to sew, draw, embroider, make things with clay, stamp things, paint... I do a little bit of everything, but I'm a master of nothing.


Here are some of my projects. Just click on the picture to see the tutorial.


You can see over thirty more crafty cpa projects by visiting my tutorial library.


Today I'd like to share a tutorial for a man's shirt messenger bag.


This bag is made from a man's shirt and has nice big manly proportions. To make this bag follow these steps:


1. Find a man's shirt with buttons and a pocket. I thrifted mine for $1.50. The size is XL.


2. Cut the front of the shirt out along the seams.


3. Cut the front of the shirt into a 16 inch square. In my square the buttons are intentionally off center so that I could include the pocket.


4. Cut five more 16 inch squares of fabric and eight 16 inch by 4 inch rectangles of fabric. I used a dark denim for the lining and the outer bag. I cut one sixteen inch square of fabric from the back of the shirt to use as part of the lining.


5. Sew one 16 by 4 inch rectangle of fabric to the top edge of the shirt front with right sides touching. This is the front of the bag flap. Sew another 16 by 4 inch rectangle to the top edge of one of the 16 inch squares with right sides touching. This is the back of the bag flap. All seam allowances are a half inch unless otherwise noted.


6. Sew the front of the bag flap to the back of the bag flap with right sides touching. Sew along three sides leaving the top open.


7. Clip seams and turn the flap right side out. Press and top stitch around three sides of the flap.


8. Prepare the outer bag and lining. Pin 16 by 4 inch rectangles (side panels) to one sixteen inch square (bag front) with right sides together and stitch. Next pin a sixteen inch square of fabric (back of bag) to one side right sides together and stitch. Fold right sides together and stitch last side together.


9. Keep bag inside out and pin a sixteen by four inch rectangle to bottom of bag and sew all four sides.


10. Repeat steps 8 and 9 for the lining.


11. Turn the outer bag right side out. Sew the top of the flap to the top of the outer bag with right sides touching. Use a 1/4 inch seam allowance.


12. Cut a 36 inch long piece of belting material for a strap and sew to the sides of the outer bag, raw edges together. Use a 1/4 inch seam allowance.


13. Place the outer bag inside the lining. Place the strap and the flap inside. Pin the tops together with right sides touching.


14. Sew around the top with a half inch seam allowance. Leave a three inch opening. Turn the bag right side out through the hole and push the lining into the bag.


15. Top stitch around the top of the bag sewing the hole closed as you go.


That's it. You now have a nice roomy messenger bag (with a built in pocket too.)


Try a more upscale bag with a man's white dress shirt and suiting material. Or maybe even button two different shirt fronts together for an interesting look.


I hope you enjoyed this tutorial.


the crafty cpa


Join me soon at the crafty cpa!


THANKS, MEGAN!!!! I've never seen this idea before and I LOVE IT! And I love the variations you mentioned at the bottom of the post. Extremely cute and very creative!


Head over to The Crafty CPA to see what unique idea Megan comes up with next!


Saturday, July 23, 2011

Guest Blogger - Kitchen Counter Chronicles - Tea Towel Hanging Bags


Kitchen Counter Chronicles


I am excited to be here at Someday Crafts, sharing my crafty ideas with all of you. Hope you enjoy my post today!


I love vintage aprons and tea towels. Today's tea towels are typically pretty boring. Tea towels from the 50's and 60's were so much more interesting. Some of my vintage tea towels are in better shape than others. I have been looking for a way to repurpose some tea towels...give them a new life. Then one day it hit me...transforming the tea towels into handy sacks.


Here's what I did.


You will need:

1 vintage tea towel
coordinating thread

iron
binding tape

2 hooks (and anchors if necessary)
screwdriver
measuring tape
pencil


Steps


1. My vintage tea towel was rather large, so I cut and hemmed it down to a 34" X 17" piece of fabric.


2. Fold your tea towel, bring the bottom edge up at approximately 15" and press the fold.


3. Sew along the sides of the tea towel...creating a large pocket...leaving about 6" piece for the flap.


4. Turn the sack right side out and press.


To make the loops:


5. Cut 2, 5"pieces of binding tape or ribbon.


6. Fold the pieces in half and pin on the backside of the sack at approximately 7" from the top and along the side seam.


7. sew the loop in place...leaving a 1" loop at the top


8. Hang the hooks in the wall or door - following the manufacturers directions.


9. Hang the bag on the hooks.


I filled mine with potatoes and hung it just outside my kitchen...on our backdoor. My 5 year old daughter suggested we put our flip-flops in the bag during the summer...great idea! These bags could be used for anything from toys and shoes to laundry and onions. I love that vintage tea towels have such a great texture - they feel soft and well worn.

I hope you come visit me at Kitchen Counter Chronicles.


THANKS for sharing this cute and easy way to make a hanging bag. I have a few tea towels in my craft room that I could definitely use as bags!

Head over to Kitchen Counter Chronicles to see more!

Tuesday, July 12, 2011

Guest Blogger - Artfully Caroline - Anthropologie Knock-off Farfalle Bag

Good morning Michelle,
Good morning Everyday and Someday Crafters!


My name is Caroline. I'm a wife, working mom, compulsive crafter and for the past year , a blogger. My little blog is called:


Creating is my therapy to stay happy in a very busy life. Juggling family, marriage, household and work is a complicated balancing act. It takes a bit of organization to save some "Me" time to blog and craft. Here are a few of my latest creations:


I'm very excited to guest post for Michelle with my latest handbag creation. A few months ago I fell in love with this Anthropologie handbag:


The Farfalle Handbag


Did you know that Farfalle means butterfly in italian? Unfortunately, three-hundred dollars purse, even this cute, does not fit in my budget. No matter. I decided to make my own. Not in leather but in denim. And here's is how:

Supplies:
NOTE: Measurements account for 1/2inch sewing allowance around the sides and bottom seams
- Two pieces of 16x12&1/2 inch denim- new or upcycled (new will be stiffer than upcycled)
- Two 3x25 inch strips of denim for the handles
- Two pieces of 6x12&1/2 inch of your choice for the lining, cotton or satin
- One 2x3 inch piece of card stock for the bow template
- 43 to 48 2x3 inch rectangles of denim for the bows
- 1 yard of coordinating blue satin ribbon
- Fray Check
- Sewing machine and sewing supplies
- Glue gun and glue sticks
- Magnetic snap (optional)
- Extra material for inside pocket
- Medium weight interfacing (optional)


How-to steps:


  • Round the edges of your card stock for the bow template

  • Use the bow template to cut the pieces needed for the bows and apply fray check on the edges


  • Make an accordion with 4 fold "peaks" on the side that will be up


  • With a matching thread, secure the fold by threading through the folds twice


  • Secure with a knot


  • Cut the pieces of matching ribbon for the center of the bows (1.5" long)


  • Put a dab of hot glue on the back of the bow tucks


  • Put the end of the ribbon on the hot glue let it cool for a couple of minutes


  • Put another dab of hot glue on the end of the ribbon and fold over


  • You will need roughly the same number of light and dark bows


  • You will save time by stitching all the bows then applying the ribbons in batch of 6-8 bows


Make the bag shell - I didn't make a detailed tutorial for this part as there are a number of very good existing ones around the blogosphere. There is a very detailed one HERE.


  • Cut the fabric pieces for the outside shell and the lining


  • Sew the outer shell and the lining for a basic bag.


  • Tuck in the top corners of the outer shell as shown on the picture below i.e. 2" wide x 3" tall

  • Pin the sides and bottom of the shell


  • Optional step : add one or 2 inside pockets to the lining


  • Add a pin a the corner of your tuck


  • Top stitch the fold all the way around


  • Once top stitched, the outer shell should look as shown below


  • Optional step : fuse the interfacing to the outer shell


  • Pin the lining and outer shell right sides together along the top of the bag lining up the side seam


  • Don't forget you will need a hole in the bottom of the lining to turn the bag right side out


  • Stitch along the bag opening with a 3/4" seam allowance and turn the bag right side out


  • Optional - Place a magnetic snap for the bag's closure using the 3/4" fold of denim as support


  • Close the opening in the lining of the bag


  • Cut and fold the straps for the bag as shown - first in half, then fold the edges in like for bias tape


  • Tuck the short edges in


  • Top stitch all sides of each strap


  • Pin the straps about 1 1/2" from the top corners


  • Stitch the handles on the bag


  • Layout the bows evenly on the front side of the bag alternating dark and light ones


  • For the layout below you need 43 bows (21 light and 22 dark) 5 across by 9 high (minus 2 at the top corners)

  • You will need more 5 bows for a tighter layout


  • Put a dab of hot glue on each side of the center ribbon


  • Secure all bows to the bag's outer shell


All done - Good news, it cost under $20 even with new denim and interfacing


Thanks again Michelle for having me over.


I hope you liked this project and will take the time to visit my blog


THANKS, Caroline! What an awesome knock-off! The bag is simply adorable! Visit Artfully Caroline today and take a look around at all the goodies she's made!