 Frugalicious Me has an easy and inexpensive Pottery Barn knock-off for everyone. She made this sophisticated vintage book bundles and it is so easy.
Monday, August 22, 2011
Pottery Barn Knock-off Vintage Book Bundles
 Frugalicious Me has an easy and inexpensive Pottery Barn knock-off for everyone. She made this sophisticated vintage book bundles and it is so easy.
Sunday, August 7, 2011
Pottery Barn(ish) Fabric Luminaries
 Create a something you would see in a Pottery Barn catalog by adding some fabric to some dollar store glass jars to create gorgeous luminaries. I love how simple and yet stunning this idea is. You can see the easy details for this project at Sassy Style Redesign.
Saturday, July 30, 2011
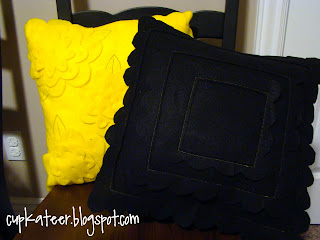
Guest Blogger - Cupkateer - Pottery Barn Inspired Felt Pillows
Don't we all look through the Pottery Barn catalogs and drool? I know I do. When I saw these pillows in PB Teen I knew I could make them for cheap!
PB version: $39
Cupkateer Version: $5
Ready to make your own? Let's get started!
Click on any of the images to make them bigger.
Scalloped Pillow
Begin by cutting the following sizes from your felt:
-17"x17"
-16"x16"
-17"x11"
-17"x11"
Step 1: Using your 16"x16" piece begin cutting your scalloped design.
Next take your 17" x 11" pieces. Stitch a 1/2" hem along the 17" side.
Now we are going to sew the front and back pieces together.
First you will need to pin your scallops out of the way.
Now, with right sides together sew the 2- 17" x 11" pieces to the main 17" x 17" piece. Use a 1/2" seam allowance.
Clip your corners, turn, and insert a 16" square pillow form.
Cut out your flower shapes. Click below to download my patterns.
Felt Pillow
height="500" width="100%" > value="http://d1.scribdassets.com/ScribdViewer.swf?document_id=23161424&access_key=key-4ng2qzwuwyqln1mq0hx&page=1&version=1&viewMode=list">
Stack the flowers using the following diagram. Tack down the center of the flowers.
Tip: I set my machine to a small zig zag, then dropped the feed dogs when I tacked the flowers down.
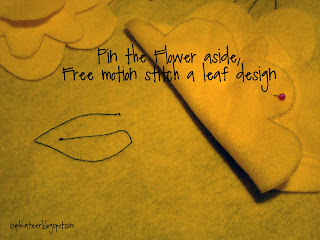
Next pin the flowers aside and add a leaf design in a contrasting thread. You can use a free motion foot, stitch them by hand, or eliminate this step.
After you've finished the leaves, tack down the petals
To finish, attatch the 17" x 11" pieces the same way as you did for the scalloped pillow.
Add a 16" square pillow form and you're done!
Not to shabby of a knock off if I do say so myself.
Friday, July 15, 2011
Guest Blogger - Willow Bean Studio - Pottery Barn Kids' Grocery Store Knock-off
Hi Someday Crafters!
I'm Jennie From

I am so excited to be here. Someday Crafts was one of the first craft sites
I came across when I discovered the world of craft blogs.
I am a Personal Assistant by Day
And Crazy Crafter by night ... LOL
I am married to my best friend and we are blessed with 2 incredible kids
My son is 7 and my daughter is 2 1/2.
Here are a few projects you will find on my blog.

Grosgrain Ribbon Flower Tutorial
Every Wednesday We Work on Slip Covering A Piece of Furniture
Today I'm going to show you how to knock off the
Pottery Barn Kids grocery store.
First, my husband constructed a wooden frame from 1" x 2"s.
He used angle brackets to secure the corners of the frame.
The finished frame measured 49 1/2" tall, 24" wide, and 19" deep.
Then I began covering the frame with canvas;
you could also use a drop cloth, old drapes, or even bed sheets
would work for making the frame cover.
First I pinned a 1 1/2 yard long piece to the frame.
I made sure to place the selvage edge along the right back edge and pinned it to my frame.
By placing the selvage edge along the outer frame, I save myself from having to clean finish that edge.
I then folded the fabric, allowing for some seam allowance, along the right front corner.
(see above far right photo)
Using straight pins, I pinned along the frame edge; this will be my sew line.
After I sewed along my pin line, I used my sewing sheers to slice open the fold.
Press your seams open and you are ready to cover the left side.
Again, make sure you line your selvage edge along the left back side and pin to frame.
Pin along the left front corner to create your sew line.
Run through your machine making sure not to run over any pins.
Cut off extra fabric along seam and press open.
Hem the bottom pressing under a 1/2" and then fold over an 1" .
Top stitch to give your hem a clean finished edge.
Next, I printed out the letters to spell the word-
"GROCERY"
I just played in Microsoft Word, experimenting with different font styles
and sizes till I found the one I liked.
"Heat n Bond" was ironed to my fabric.
I pinned my computer printed letter pages to the fabric
and cut them out.
I peeled off the backer paper exposing the adhesive.
Pin the covering to the frame with your hem line flush with the floor.
Pin the letters to the front of your store.
Positioning them to fit your taste.
Use straight pins to secure the letters until you can iron them in place.
I used a 1/4" wide grosgrain ribbon to outline the store front window opening.
I eyeballed the placement of the ribbon while the cover was pinned to the frame.
Just fold the ribbon over when you reach the corners.
I edge stitched around both sides of the grosgrain ribbon to secure in place.
To make the windowsill, I pressed a 3" wide piece of tan fabric to the heat n bond.
I made sure the piece was longer than the window opening.
Remove the paper backing and position your windowsill while the covering is pinned to the frame.
Remove fabric covering from frame and iron to fabric windowsill in place.
The greatest part about using the "Heat n Bond" is that if you want you can leave the
sill as is. There is no need to finish off the applique edges.
I chose not to finish off the edges of my letters because I felt it took away from the print I used.
But, I used a satin stitch to go around the edge of my windowsill to add a little dimension.
I also thought this opening would see a lot of wear and tear,
so by finishing off the edge I am strengthening the opening.
At this point, you may add the roof to your store.
I attached a piece of ribbon that was 18" long to the outer corners of my store to form the "ties".
These "ties"will be used to secure the cover to the frame.
I also placed some in the seams above and below the window frame opening.
We are almost done!
At this point, I gave the frame cover one last good pressing.
Place it over your frame and tie into place.
Using tiny sheers, I cut along the inner edge of my window -
Making sure not to cut into the ribbon or the fabric windowsill.
The store is now completed!
We are OPEN and ready for business!
If we could only get some customers ... LOL!
I would just like to thank Michelle again for allowing me the opportunity
to share this post with all of you.
Hope you enjoyed this tutorial and will stop by my blog to follow along with my latest creations.

THANKS, JENNIE! My kids would love a grocery store. Whenever we go to a kids' musuem that has a grocery store, they spend the most time playing there! This is a great knock-off!
Head over to Willow Bean Studios to see all the great creations and ideas there!
Thursday, July 7, 2011
Guest Blogger - Sweet Peas & Bumblebees - Pottery Barn Kids' Artwork Clothesline
Hi Someday Crafts readers!
I am thrilled to be unveiling my latest craft project here at Someday Crafts! I love Michelle’s blog and am constantly checking out her newest finds. Thanks to Michelle, I have quite the collection of pins on Pinterest! (:


I’m Briana from the blog Sweet Peas & Bumblebees. My twin sister and I LOVE to blog about all things crafty and thoroughly enjoy spending our time creating! We even have a linky party on Wednesdays where you can show off your craftiness! We totally love seeing everything you all come up with and would love if you would join us!
Now for my tutorial…
Kid’s Artwork Clothesline {Pottery Barn Knock Off}
My kids love to create their own masterpieces, but I have yet to find a great spot to show off their latest art. Before, my fridge was covered in their creations and they ended up getting lost underneath magnets and dentist reminders. I wanted to be able to show them off like the proud Mom I am!
When I saw these super cute artwork displays at Pottery Barn Kids, I knew they would be perfect! The only problem?!? My hubby would never agree to me spending $39….each….$78 total. Yikes!
I knew I could make an amazing art display for just a fraction of that. In fact, by using supplies that I already, I only spent about $4 per artwork display! Love it!
Here are the supplies that I had to purchase:
I debated on what to use for my actual clothesline. I eventually settled on picture wire. It’s easy to use and very inexpensive. This 25 feet roll was only $2.99!
I found these already painted wooden cutouts at Wal-Mart for $1 each. Score!
Additional supplies needed:
Rhinestones *optional*
Vinyl
Once you have all of your supplies, it’s time to start hanging up your clothesline!
Using a measuring tape, start marking the wall with pencil where you would like your screws to go. {I measured 35” down from the ceiling and made a mark.} Make sure your screws are level to each other!
{I used screws to anchor my clothesline because we seem to have an overabundance of them at our house! Nails would work great too!}
Now string a piece of picture wire between your two screws. Another benefit of using picture wire…all you have to do is twist it around itself and it stays! I didn’t leave a lot of slack because I didn’t want it to droop a lot once the weight of the artwork was pulling on the wire.
Add a little dot of hot glue to the top of your screw and attach your wooden cutout. {Don’t worry about it never coming off…it will come off with some tugging when the time comes.}
To dress up your clothespins, pick out some matching scrapbook paper and trace the top of the clothespin onto the back of your scrapbook paper. Cut out your strip of paper and Mod Podge it to the front. Let them dry several hours before you try to use them.

Using my Cricut along with my Sure Cuts A Lot 2 software, I cut out my vinyl quote. Using this incredibly easy software, I was able to use several of my favorite fonts: Digs My Heart, Grace, and His Name Is Honey.
Now it’s time for the fun part…hanging up your little one’s art!
And if you have a little guy in your life, here is the boy version!
Thanks for letting me share my tutorial today!
Come visit me at Sweet Peas & Bumblebees to see some of our other great tutorials like these:

THANKS, Briana. I love easy knock-offs and this was certainly an easy, cute idea. I have the same situation with artwork EVERYWHERE. I need to get the picture wire out and hang some pictures! I lover your subway art flower pot! Looks like we all need to be hanging out at Sweet Peas & Bumblebees!


