Showing posts with label knock-off. Show all posts

Thursday, September 8, 2011

Guest Blogger - Henry Happened - Anthropologie Knock-off Necklace


Hi! I'm Stephanie, a mother of two with a DIY addiction! I blog about stylish and crafty adventures at Henry Happened. I love to create fun accessories and I'm especially fond of making bracelets (like this one and this one).

When I saw
this necklace on Anthropologie, my first question was, are those paperclips? Then I thought how fun and easy it would be to make a similar necklace for WAY less than $198!
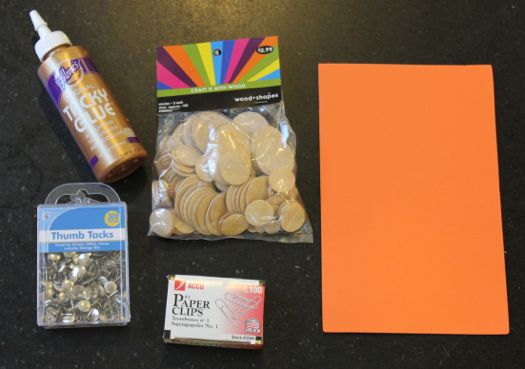


For the basic necklace - a fun project with kids - you will need:


  • Round wood shapes (found at Hobby Lobby for $2.99)


  • Piece of foam paper (found at Hobby Lobby for $0.80) Lots of great colors - I went with orange to match the inspiration necklace.


  • Thumb tacks


  • Paper clips


  • Glue

To take it a step further and get closer to the inspiration product, you will also need:


  • Gold spray paint


  • Wire cutters

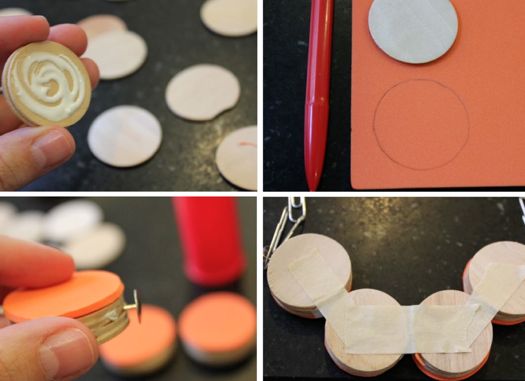
Step 1: Glue 4 of the largest size circles together. Make 4 of these stacks.

Step 2: Trace 4 circles on the foam paper. Cut out and glue these on top of the 4 wooden circles. Cutting the circles was, for me, the hardest part. I'm sure there's a cutting tool that would make this way easier. My circles are not perfect, but I rather liked them a bit irregular.


Step 3: For two of the stacks, insert a thumb tack between the 2nd and 3rd wooden circles.

Step 4: Arrange the 4 stacks - two side by side with the other two on the outside at 11 o'clock position - and glue between them. Put some tape on the back to keep everything together while the glue dries.

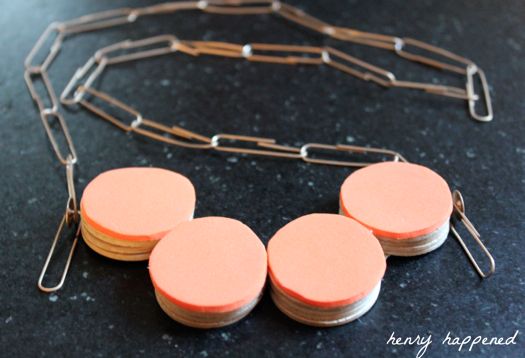
Step 5: You can stop here and make a really cute statement necklace by lacing the paper clips together.


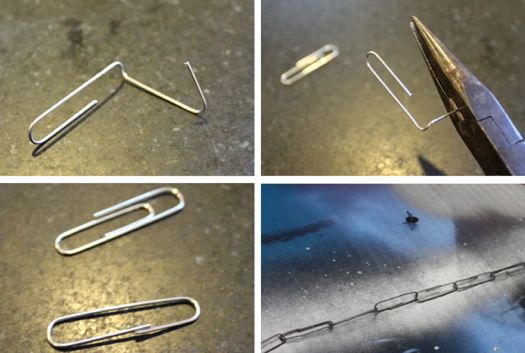
Step 6: Or you can keep going and cut off the inside loop of the paper clip with wire cutters.

Step 7: Spray paint both sides of the paper clips and thumb tacks with gold spray paint. (Yes, I used gold though my picture looks like it's silver!)

Two notes: I would recommend not linking the paper clips when spray painting as it makes it harder for the paint to reach all of the surfaces. Also, I was able to easily remove my thumbtacks, paint, and then stick them back in.


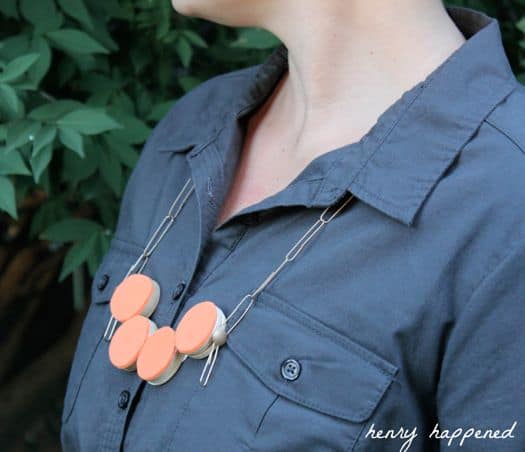
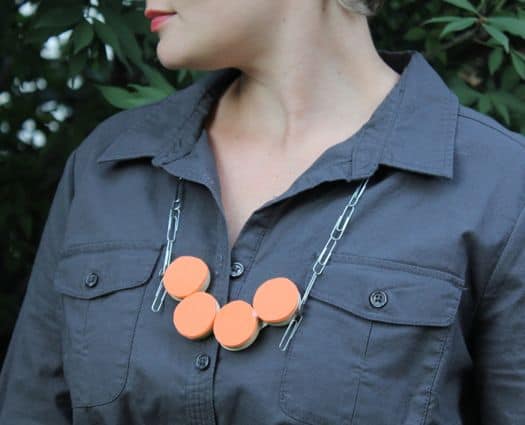
The final product!


Thank you for letting me visit here today!! I hope you will stop by Henry Happened and say hi!


Henry Happened


Thanks, Stephanie! Who would have thought that paper clips could make such a cute necklace? Especially one from Anthropologie!!! Your knock-off is such a whimsical piece to add to any collection! Visit Henry Happened today and see all the fun thing Stephanie has going on!!!!

Tuesday, September 6, 2011

Anthropologie Necklace Knock-off

Flamingo Toes has a serious knack for knocking off beautiful necklaces. This Shepard Moon necklace from Anthropologie is no exception. She's done a fabulous job of recreating it!


Friday, August 26, 2011

Wednesday Party Highlights


I missed posting some party highlights this week because my computer was not cooperating! Here are a few lovely projects that I would love to see in my house or do!


I want a couple shelves filled with these Restoration Hardware industrial basket knock-offs at my house. I have quite a few shelves that would more stylish with these babies! Blissfully Ever After is the creator of these!


Have the style of Ballard Design without the high cost by building these cafe shelves by yourself. Great tutorial by That Village House.


I'm loving how A Little Tipsy glammed up her builder grade bathroom mirror by adding some frosting around the edges. (That sounds funny!) Pretty, Pretty frosted-edged mirror!


Check out these gorgeous skinny ruffled headbands at Flamingo Toes! So pretty and feminine.


I've never met a kid who didn't like to play in water with their hands. This water wall looks like so much fun! A Family That Birds Together has some happy children because of this contraption!


Monday, August 22, 2011

Pottery Barn Knock-off Vintage Book Bundles

Frugalicious Me has an easy and inexpensive Pottery Barn knock-off for everyone. She made this sophisticated vintage book bundles and it is so easy.


Monday, August 8, 2011

Ruffles and Buttons Anthro knock-off Shirts

I've seen this beautiful ruffle and button Anthro knock-off shirt going around blogland. EVERYONE is loving it and making it for themselves. I thought I should show it off one more time so if you can make it too (if you haven't already)! Busily Spinning Momma has a very detailed tutorial for this long sleeve shirt turned Anthro short sleeve and ruffly!


This cute shirt is a knock-off of the former Anthro knock-off. It is adorable. You should see the dress that it is a part of at Mommy By Day, Crafter At Night. No tutorial, but it shouldn't be to hard to figure out using the first tutorial!


Friday, August 5, 2011

Ballard Design Quatrefoil Latern Knock-off

You are not going to believe what this Ballard Design knock-off is made out of. Choose To Thrive has totally nailed the original, expensive quatrefoil latern for a very, very inexpensive price! You gotta love projects like this that look like a million dollars, but only cost a few quarters to make!!!!


Saturday, July 30, 2011

Guest Blogger - Cupkateer - Pottery Barn Inspired Felt Pillows


Since I didn't have a guest post scheduled for today, I thought I would re-run one of my most popular guest posts ever. This was one of the first guest posts on my site and it is amazing!


Hi, it's Ananda from over at Cupkateer.


I am excited to be guest posting on Someday Crafts today.


Don't we all look through the Pottery Barn catalogs and drool? I know I do. When I saw these pillows in PB Teen I knew I could make them for cheap!


PB version: $39


Cupkateer Version: $5


Ready to make your own? Let's get started!


Click on any of the images to make them bigger.


Scalloped Pillow


Begin by cutting the following sizes from your felt:


-17"x17"

-16"x16"

-17"x11"

-17"x11"


Step 1: Using your 16"x16" piece begin cutting your scalloped design.


Tip: I use a white crayon when marking dark colored fabric. Afterwards I use a pressing cloth and iron it. The crayon marks will stay on the pressing cloth, not your fabric.


Next you will be cutting out the center. I cut a piece of scrapbook paper to use as the pattern. Cut a opening 12" x 12"


Repeat the previous steps to make 2 more scalloped layers. With the following dimensions:


-11"x 11" square scalloped, 8" x 8" center


-7" x 7" square scalloped, 4" x 4" center


Then...


Next take your 17" x 11" pieces. Stitch a 1/2" hem along the 17" side.


Now we are going to sew the front and back pieces together.


First you will need to pin your scallops out of the way.


Now, with right sides together sew the 2- 17" x 11" pieces to the main 17" x 17" piece. Use a 1/2" seam allowance.


Clip your corners, turn, and insert a 16" square pillow form.


Flower Pillow


Begin by cutting the following sizes from felt:


17" x 17"


17" x 11"


17" x 11"


Scraps for flowers


Cut out your flower shapes. Click below to download my patterns.


Felt Pillow


height="500" width="100%" > value="http://d1.scribdassets.com/ScribdViewer.swf?document_id=23161424&access_key=key-4ng2qzwuwyqln1mq0hx&page=1&version=1&viewMode=list">


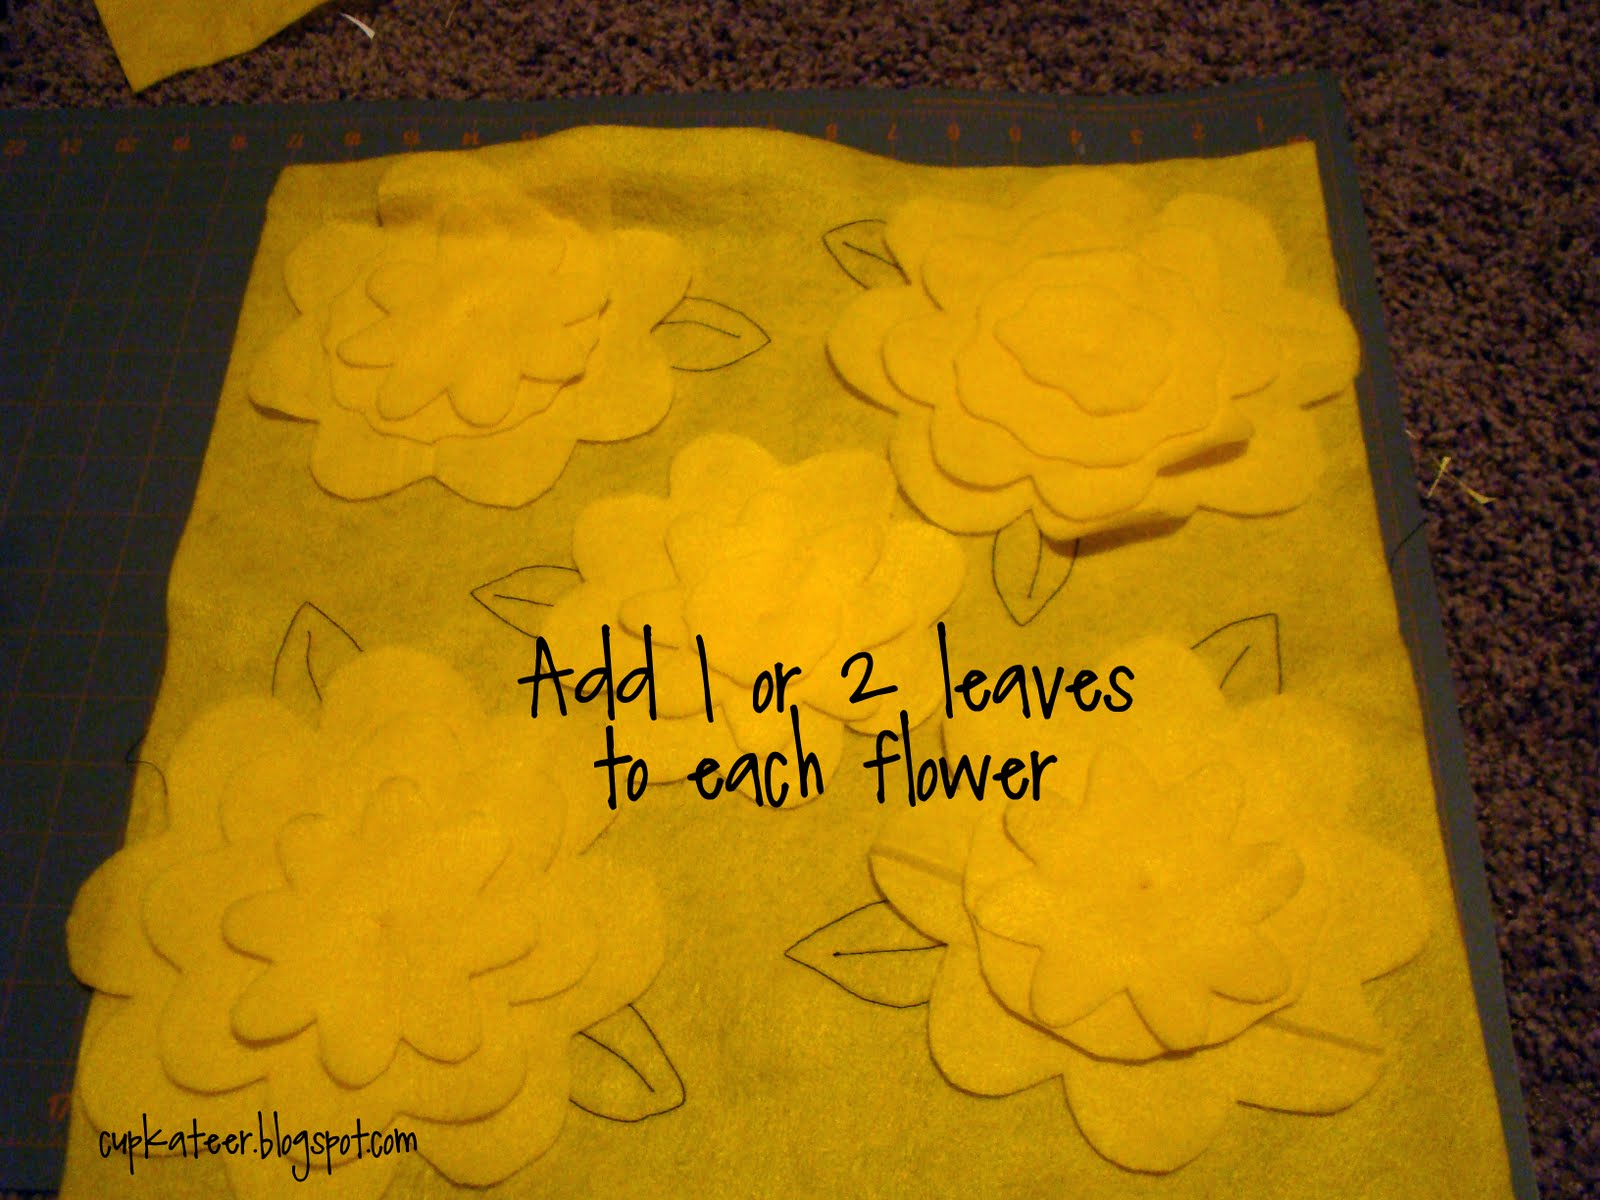
Stack the flowers using the following diagram. Tack down the center of the flowers.


Tip: I set my machine to a small zig zag, then dropped the feed dogs when I tacked the flowers down.


Next pin the flowers aside and add a leaf design in a contrasting thread. You can use a free motion foot, stitch them by hand, or eliminate this step.


After you've finished the leaves, tack down the petals


To finish, attatch the 17" x 11" pieces the same way as you did for the scalloped pillow.


Add a 16" square pillow form and you're done!


Not to shabby of a knock off if I do say so myself.


Thanks, Ananda!!! That was amazing!!! I would love to have some of those pillows on my daughter's bed. If you liked that tutorial, go check out Ananda's blog, Cupkateer, HERE. She has great ideas all the time.


****Update 7-30-2011 Unfortunately, Cupkateer is no longer blogging, but there are quite a few amazing tutorials left on her blog!****


Tuesday, July 19, 2011

Guest Blogger - The Gunny Sack - Horchow Knock-off Flower Petal Pillow


Hello Everyone, my name is Tonia and you can find me over at:


Congratulations to Michelle and her family on the birth of their darling new baby Remington!! I am so thrilled to be a guest on Someday Crafts while Michelle is enjoying time with her family.


I am a mom to three beautiful children and have been married for 16 years to my wonderful husband, Brian.


I want to invite you over to The Gunny Sack where I post crafty tutorials (Wire Memo Board), sewing tutorials (Sunglasses Case), fun stuff for the youngsters (yarn bowl) and recipes (Chocolate Chip Cookie Cake). But today I will share a new tutorial with you:


Knockoff Delancey Felt Petal Pillow from Horchow


Horchow sells this pillow for $145.00! I thought it was beautiful but unaffordable so I decided to make a knockoff and share the tutorial with you!

A free printable pattern for the flower pieces can be downloaded here.


To make the petals, I cut 1 inch wide strips of felt, cut the long strip into pieces slightly bigger than the petal pattern piece and then cut out the petals. I did not count how many pieces I needed, but it is a big stack! You can cut more as you go!


Lay the petals around the circle and sew them on. Make 4 layers of petals this way.


Sew a few stitches by hand to give the top petals shape and attach them to the center of the flower by hand stitching it.


Now, for the pillow, cut 1-14x14 inch square and 2-9x14 inch rectangles of the felt. I also cut 1-14x14 inch square and 2-9x14 inch rectangles of lace to add some texture to the pillow.


Stack a 9x14 inch felt piece and a lace piece and hem one of the 14 inch sides. Then, do the same with the other 9x14 inch pieces.


Now layer felt, lace, lace, felt and overlap the 2 back pieces as shown in the picture above and pin it in place. Then, sew around the outside of the fabric pieces and turn the pillow cover right-side-out.


1. Hot glue flower bases on pillow, close to each other so petals can overlap.


2. There are 4 open spaces in the center of the pillow between the flowers.


3. Cut out more of the top petals and sew 2 of the together.


4. Hot glue the top petal pairs into the 4 spaces.


Stuff pillow with your choice of filling or a pillow form.


Thanks for checking out my tutorial and I hope to see you soon at


THANKS, TONIA! That is one of the most beautiful pillows I have EVER SEEN! Your knock-off looks just like the real thing! I'm amazed! Thanks for sharing.


Visit The Gunny Sack today to get more awesome ideas to improve your life and home!