Showing posts with label felt. Show all posts

Wednesday, September 7, 2011

5 Great ideas!

Another great week of link-ups! I can't highlight them all so here are just a few!


Bring on the glitter! Queen of Iwasagonna glammed up some 2x4 with orange glitter to make some rockstar glitter pumpkins!

Why didn't I think of this simple idea? My son will not wear any type of tie if it clips inside his shirt! Love City basically attaches a safety pin to the tie and the shirt! This would totally work with my son (and probably yours)!

I love this idea from seven thirty three - A Creative Blog for the first day of school pictures. So fun!


Just Sew Sassy created a belt of felt flowers for the fall! It's gorgeous! (It would look cute as a headband too!)


Eating My Candy has found another thing you can spray paint - your shirt! I love her technique for spray painting a shirt!


See more links to the Whatever Goes Wednesday Party.


Saturday, July 30, 2011

Guest Blogger - Cupkateer - Pottery Barn Inspired Felt Pillows


Since I didn't have a guest post scheduled for today, I thought I would re-run one of my most popular guest posts ever. This was one of the first guest posts on my site and it is amazing!


Hi, it's Ananda from over at Cupkateer.


I am excited to be guest posting on Someday Crafts today.


Don't we all look through the Pottery Barn catalogs and drool? I know I do. When I saw these pillows in PB Teen I knew I could make them for cheap!


PB version: $39


Cupkateer Version: $5


Ready to make your own? Let's get started!


Click on any of the images to make them bigger.


Scalloped Pillow


Begin by cutting the following sizes from your felt:


-17"x17"

-16"x16"

-17"x11"

-17"x11"


Step 1: Using your 16"x16" piece begin cutting your scalloped design.


Tip: I use a white crayon when marking dark colored fabric. Afterwards I use a pressing cloth and iron it. The crayon marks will stay on the pressing cloth, not your fabric.


Next you will be cutting out the center. I cut a piece of scrapbook paper to use as the pattern. Cut a opening 12" x 12"


Repeat the previous steps to make 2 more scalloped layers. With the following dimensions:


-11"x 11" square scalloped, 8" x 8" center


-7" x 7" square scalloped, 4" x 4" center


Then...


Next take your 17" x 11" pieces. Stitch a 1/2" hem along the 17" side.


Now we are going to sew the front and back pieces together.


First you will need to pin your scallops out of the way.


Now, with right sides together sew the 2- 17" x 11" pieces to the main 17" x 17" piece. Use a 1/2" seam allowance.


Clip your corners, turn, and insert a 16" square pillow form.


Flower Pillow


Begin by cutting the following sizes from felt:


17" x 17"


17" x 11"


17" x 11"


Scraps for flowers


Cut out your flower shapes. Click below to download my patterns.


Felt Pillow


height="500" width="100%" > value="http://d1.scribdassets.com/ScribdViewer.swf?document_id=23161424&access_key=key-4ng2qzwuwyqln1mq0hx&page=1&version=1&viewMode=list">


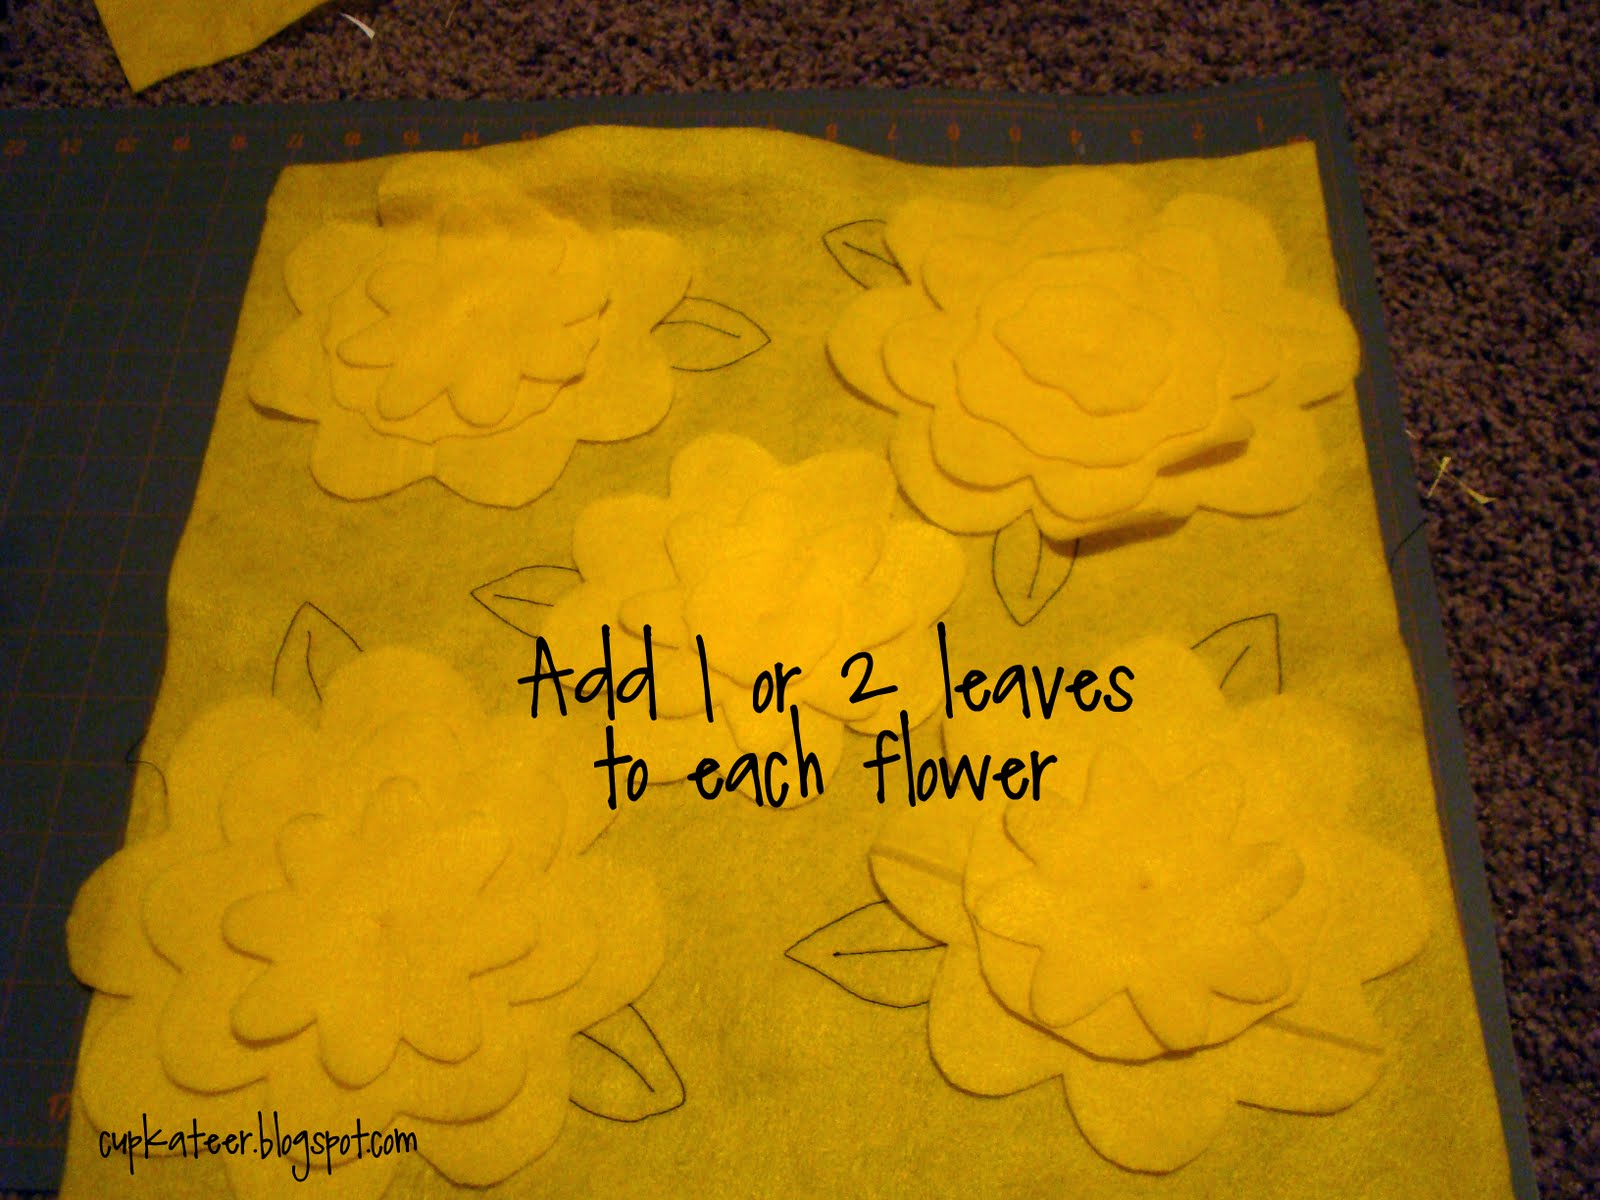
Stack the flowers using the following diagram. Tack down the center of the flowers.


Tip: I set my machine to a small zig zag, then dropped the feed dogs when I tacked the flowers down.


Next pin the flowers aside and add a leaf design in a contrasting thread. You can use a free motion foot, stitch them by hand, or eliminate this step.


After you've finished the leaves, tack down the petals


To finish, attatch the 17" x 11" pieces the same way as you did for the scalloped pillow.


Add a 16" square pillow form and you're done!


Not to shabby of a knock off if I do say so myself.


Thanks, Ananda!!! That was amazing!!! I would love to have some of those pillows on my daughter's bed. If you liked that tutorial, go check out Ananda's blog, Cupkateer, HERE. She has great ideas all the time.


****Update 7-30-2011 Unfortunately, Cupkateer is no longer blogging, but there are quite a few amazing tutorials left on her blog!****


Tuesday, July 19, 2011

Guest Blogger - The Gunny Sack - Horchow Knock-off Flower Petal Pillow


Hello Everyone, my name is Tonia and you can find me over at:


Congratulations to Michelle and her family on the birth of their darling new baby Remington!! I am so thrilled to be a guest on Someday Crafts while Michelle is enjoying time with her family.


I am a mom to three beautiful children and have been married for 16 years to my wonderful husband, Brian.


I want to invite you over to The Gunny Sack where I post crafty tutorials (Wire Memo Board), sewing tutorials (Sunglasses Case), fun stuff for the youngsters (yarn bowl) and recipes (Chocolate Chip Cookie Cake). But today I will share a new tutorial with you:


Knockoff Delancey Felt Petal Pillow from Horchow


Horchow sells this pillow for $145.00! I thought it was beautiful but unaffordable so I decided to make a knockoff and share the tutorial with you!

A free printable pattern for the flower pieces can be downloaded here.


To make the petals, I cut 1 inch wide strips of felt, cut the long strip into pieces slightly bigger than the petal pattern piece and then cut out the petals. I did not count how many pieces I needed, but it is a big stack! You can cut more as you go!


Lay the petals around the circle and sew them on. Make 4 layers of petals this way.


Sew a few stitches by hand to give the top petals shape and attach them to the center of the flower by hand stitching it.


Now, for the pillow, cut 1-14x14 inch square and 2-9x14 inch rectangles of the felt. I also cut 1-14x14 inch square and 2-9x14 inch rectangles of lace to add some texture to the pillow.


Stack a 9x14 inch felt piece and a lace piece and hem one of the 14 inch sides. Then, do the same with the other 9x14 inch pieces.


Now layer felt, lace, lace, felt and overlap the 2 back pieces as shown in the picture above and pin it in place. Then, sew around the outside of the fabric pieces and turn the pillow cover right-side-out.


1. Hot glue flower bases on pillow, close to each other so petals can overlap.


2. There are 4 open spaces in the center of the pillow between the flowers.


3. Cut out more of the top petals and sew 2 of the together.


4. Hot glue the top petal pairs into the 4 spaces.


Stuff pillow with your choice of filling or a pillow form.


Thanks for checking out my tutorial and I hope to see you soon at


THANKS, TONIA! That is one of the most beautiful pillows I have EVER SEEN! Your knock-off looks just like the real thing! I'm amazed! Thanks for sharing.


Visit The Gunny Sack today to get more awesome ideas to improve your life and home!


Sunday, July 3, 2011

Guest Blogger - My Life and Kids - Felt Flower Magnets


Hi, I'm Anna. I had three kids in three years, and whew, has my life changed. Just a few years ago, I had a great job, lived in the city with my hubby and my dog, and I had a social life. Then we had our three kids, I turned 30, we moved to the suburbs, we bought a minivan, and I quit my job. Can I get some mom jeans to go with my new life?


Now I spend my days with two toddlers and a baby, and I spend my naptimes doing crafts and fixing up the neglected house we bought in the suburbs. And in my spare time, I blog about it all at


My Life and Kids.

Now onto today's tutorial.
Felt Flower Magnets


These little beauties look so lovely on my fridge. And they're my new favorite gift to make for friends and family. Now you can make them too!
I first saw something like this in Woman's Day magazine. They used buttons and created them as pins. I loved them instantly, but I didn't feel like I'd get enough use out of it as a pin. So I changed things up a bit and made them into magnets. (You can see the Women's Day tutorial
here.)


Supplies:

1 or 2 coordinating colors of felt


Button, earring, jewelry - something round that you can use in the center
Measuring tape or ruler
Scissors
Needle and thread


Pins


Glue gun
Magnets (.75 inches in diameter work the best)


Cut the larger piece of felt (the color that will be the back of your flower) into a 2 1/4" wide strip. And then cut the length down to 6".


Fold it in half lengthwise, and pin the long edges together.


Cut slits along the folded edge. You can play around with how wide you want them to be. You really can't mess this up - just don't cut all the way through the felt. Leave about a 1/3" uncut border along the bottom - but it doesn't have to be exact.


Using your needle and thread, sew a running stitch all along the pinned edge. As you sew, tug at the thread so that the sewn edge gathers and begins to form a circle. (You won't be able to see the thread, so any color will work.)


Once your circle is fully formed, cut off the excess felt, leaving the needle and thread still attached.


To keep your gathers in place, sew a running stitch back through the circle around the sewn edge.


Join the two ends of your circle together by folding it in half. Sew a few whipstitches along the edges to keep it together. Start at the center of the circle and end it where the slits begin. Knot your thread and cut.


Your circle should look something like this. See? It doesn't have to be perfect.


In your coordinating color of felt (this will be the inside circle of the flower), cut a 1 3/4" wide strip and then trim it to 6" in length.


Follow the steps above to sew a second, smaller circle.


You should have two circles like this.


Fire up your glue gun, and glue the smaller circle on top of the larger circle.


Then glue your button, earring or jewelry on top of both circles to cover the hole in the middle. I used an old clip-on earring here.


The back of your flower won't be so pretty. No worries, just glue your magnet onto the back.


Ta-Da!


These magnets are the perfect way to dress up a fridge, magnet board, locker or tin bucket. And they make wonderful gifts!


Stop by My Life and Kids to see my other tutorials, like making curtains out of twin sheets, creating a US map out of scrapbook paper and what to do if you accidentally toss a disposable diaper into the washing machine. Yikes!


Want to know how to make these little guys? Visit http://www.mylifeandkids.com/

and click on My Tutorials.


THANKS, Anna. I need more cute magnets to hold up all my kids' artwork. These could easily do the trick! I don't know how you do three kids in three years. I'd go insane! I will have to read back to the beginning of My Life and Kids and learn all your secrets!!!! Visits My Life and Kids today!