I am so excited to be here at Someday Crafts... My name is Carlee, and I have a little blog with my sister Alyssa called
Ladybird Ln. Before I get into my post today, I want to tell you a little about
MICHELLE!

She is very
SCARY.... or so I thought the very first time I met her.. You see, she was the teacher I student taught under... She intimidated me at first, but I soon realized what a great teacher she is, how much she cared about each of her students, and how well she was preparing me. Your first year of teaching, everyone says is really hard and challenging with a lot of surprises, but it was NOT for me. It was busy of course, but I didn't feel there was anything I couldn't handle. I attribute most of this to Michelle, she trusted me to do some very challenging things as a student teacher, that prepared me well for my first teaching job! I think so highly of Michelle, and I stalked her blog even before I knew she was the gal behind it all!

I am so excited to team up with Michelle for
Crafting for a Cause! I feel so blessed to have the family and freedom that I enjoy.
I do not have a lot of money at my disposal... but I can craft. That is kind of the idea behind Crafting for a Cause. We hope to showcase you, and simple projects that we can all participate in that will make a difference. I am excited for this journey, and I hope that you will join us! You will have the opportunity to share your service/charity project by participating in our monthly linky party. We will also give you the opportunity to participate in our featured service project for that month!

We decided to start our first service project with a PILLOW FIGHT,

This month, I am featuring a project very near and dear to my heart. I have a great friend, Malynn, who is 14 years old, and has undergone some tough TOUGH medical stuff recently. She has been in and out of the hospital for the past 6 months. One might expect after all the medical problems she has endured, she would be bitter and resolved. But not Malynn! She is amazing in so many ways. Instead of focusing on her issues, she wants to help others. Malynn is an incredible seamstress, at the age of 14, she far surpasses my sewing ability! Just look at one of her latest purses..

Yup, she is amazing! She has made it a goal to
donate 100 bright cheerful pillow cases to Primary Childrens Medical Center, to brighten up the patients rooms! When she was in the hospital, it was so comforting to have her own pillow.
I decided I wanted to help her out with this great cause.... and what better way than a

PILLOW FIGHT!
It is called
Pillow Fight--For a Cause! Essentially, this is a pillow contest where you can enter your homemade ruffly throw pillows, your sweet decorative pillows, your fleecy flower pillows, your bedazzled pillowcases... pretty much anything pillow related, that you have made.
THE CLINCHER IS,
in order to enter this contest, you must donate a pillowcase, one pillowcase per entry! A bright, cheery, fun pillow case! You can either send it to me, and I will let Malynn donate it, or you can donate it to a local hospital, womens shelter, etc. You just have to let me know that you donated one!
We have some
FABULOUS prizes for this contest. HUNDREDS of dollars worth of prizes! We will have guest judges narrow down the pillow field to ten, and then open it up to voting. The top three pillows will receive some amazing prizes. Sponsors for this event include...
Kati Cupcake, Cap Creations, Sew Obsessed, Vinylize It, Funky Polkadot Giraffe, Naptime Crafters... And Malynn and I are even going to throw in some prizes. We will also have one random prize for anyone who links up--sound terrific, I think so! For more information click
HERE!So are you in? What is that you say, you don't know how to make a pillowcase? Well, let me show you! Creating a pillow case is simple, fast, and fun. It is a great beginner project, for any age. This would be a great project to teach your child how to sew! It took me
less than an hour to complete this pillow case, and that was taking pictures as well!
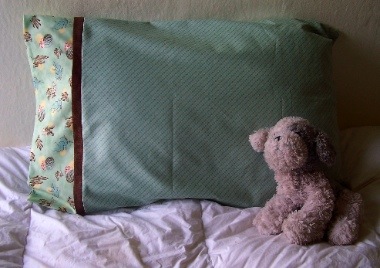
Basic Pillow Case

Cutting List:
Main Body Fabric: 3/4 yard fabric {or 27 inches by Width of Fabric (WOF)}
Band Fabric: 1/4 yard fabric {or 9 inches by WOF}
Trim Fabric: (Optional): 1 strip, 2 inches by WOF
Instructions:
All seams are 1/4 inch, unless otherwise noted.

With wrong sides together, fold the band fabric in half lengthwise and press. Do the same with your trim fabric.

Baste together the folded trim piece to the folded band fabric. 1/8 inches from the raw edges along the length of the strips.

Basting, simply means create a long running stitch, so that the two pieces stay together. Don't worry if they do not line up perfectly at the ends, we will fix it later on.

Pin the band/trim to the right side of the pillowcase panel along the long edge, raw edges together, with trim sandwiched in the middle.

Sew together. Zig zag, serge, or overlock raw edges together (To help prevent fraying).


Trim up the uneven layers of your pillow. I used a rotary cuttery, ruler, and mat. But you could just use scissors!

Your pillow case should look like this now!

Fold the pillowcase right sides together. Pin together, making sure to match the band seam line. Sew a strait seam along raw edges. Zig zag, serge, or overlock raw edges.

Turn right side out; Press! You are finished Easy Peasy right! Below is some pillow case inspiration, all of these pillow cases are ones that I made, or that were given to me. Pillowcases make great gifts!

I tried to make this tutorial as strait forward as possible, but you can email me with any questions!
Please come join the Pillow Fight, on our blog!
You can link up your pillow creations
June 15-22! I am trying to spread the word about this contest, I would love to donate 100 pillow cases! I can not imagine what it would be like to have a child in the hospital for extended periods of time. I hope these pillowcases can be a comfort, and reminder of home! Please put a button on your blog, or contact me, I would love to come to your place and guest post about it!Thanks Michelle for letting me crash your blog today! I am so excited to do a
Crafting For A Cause project each month with Someday Crafts!
THANKS, Carlee and Ladybird Ln. Didn't I tell you that this would be a great idea for our first Crafting For A Cause? A bright, colorful pillowcase for sick kids in a hospital! Love it!
I hope you all would like to join in and brighten some kids' days!
 This is the first patriotic project I've featured because I was going to wait until after Father's Day, but it is so cute I couldn't wait! Head over to Simply Designing to see how to make these fabulously darling topiaries made of red, white and blue stars! I love July decor!


