Showing posts with label ribbon. Show all posts

Monday, September 19, 2011

Guest Blogger - Rummage Living - Greek Key Applique


Hi Someday Crafters! I'm Margaret from


The Rummage Living Blog


Rummage Living


and I am beyond excited to be guest posting today!


I am obsessed with the Greek Key design. I think it adds just the right amount of pattern and posh into any space, and onto any surface. When I discovered this little method, I was trying to find a way to incorporate Greek key to my home on a budget.


Enter: Grosgrain ribbon + Ikea on sale curtains = Um. Yes.


This project is actually really easy. I did my applique on curtains but you can tailor (no pun intended!) this to literally, anything- pillows, tablecloths, shams & bedskirt (yum), whatever! You'll need about 2.5 rolls of ribbon (I based this in 12 ft per roll) per panel, depending on how tall they are. You'll make the actual design in two parts. The key is making sure you have have enough ribbon left on your roll to run all the way up the length/width of the curtain. This will make sense in a second. See? Up and over.


The general setup is: The "inside" vertical of the squares will be one continuous line and the top horizontal portion of the squares will be one continuous line and attach the squares. The only corner you'll need to make from 2 cut pieces will be the outside bottom corner of the squares. With me?


The way to make the corners is actually pretty easy. Fabric glue makes a great seam until you sew the applique on. Take the ends so they cross perpendicularly over each other forming a 90 degree angle.


Make a small mark on the inside and outside of that square formed.


Make a crease from the inside bottom of the square to the outside corner to serve as a guide for your fabric glue and apply a thin line of fabric glue (yes, its okay that it's on the side of the ribbon you want to face out)


Then make the "right" side of your ribbons "kiss" so the creases line up.


Press so the glue holds- you can even apply heat from an iron if you have one handy. And gently peel back the top layer to reveal your lovely corner! I used two 6'' pieces, knowing that about an inch on each end would get used up by the seam. You'll also probably have a little extra peeking through that you can just trim.


So that was the bottom outside corner. Attach the other two corners in the exact same way, except you run the length of the ribbon either up the length or across the width.


I pinned the applique in place and then sewed it on for a more permanent bond.


See? If I can do this, you TOTALLY can. And how chic do they look?!


(Do you not love my desk chair. $30 at Goodwill, baby!)


(pssst...If you're a South Floridian, check out The Rummage Guide for my local thrift and consignment store reviews, from the Palm Beaches on down!)


Thanks so much for coming on this Greek Key adventure with me and SO many thanks to Michelle for letting me take over their AMAZING blog today! Stop by to see me at RummageLiving to see how I hung them in my rental dining room- turned- home office without curtain rods!


Don't forget to swing by on Friday's for my link party, T.G.I.F. ( Thank God I'm Finished)


Photobucket


to link up your projects big and small! I pick favorites every week so head on over cause it's going on right now!


Xo,Margaret


Thanks, Margaret!!! I've always loved that design and never knew what it was called! Now I know! It does look fabulous! I'd love some pillows with the Greek Key design. Head over to Rummage Living to check out the other fabulous projects she has on her site!


Wednesday, July 27, 2011

Whatever Goes Wednesday #76


Welcome to this crazy day of linky love and blog exploration! I love to see what is new out there in blog land. Get started clicking away to view everyone's creations!


I'd love for you to stick around and click on at few a links before leaving. Don't be a link-and-run blogger!


NEW SPONSOR


For ribbon, fabric and more, check out The Ribbon Retreat! So many craft goodies to desire!


GIVEAWAY


You've got to check out this cute Bacon Time blog and her corresponding etsy shop called TLC Creations! They are both fantastic! Enter the giveaway worth $75 HERE.


MOST VIEWED LINK LAST WEEK!


Based on the number of views City Girl Gone Coastal received last week in her post about ribbon storage, I'm not the only one with a serious ribbon problem! I gotta find me a dowel and a small box!


BLOG TIP


Today's blog how-to is brought to you by The Letter 4


HOW-TO: Widen your blog!


I'm loving the width of my new blog design. You may want to think about making yours wider too!


CRAFTING FOR A CAUSE


Crafting for a Cause

Check out the Crafting For A Cause this month. Help the Funk family adopt a daughter!


Don't forget to check out the Giveaway Directory tomorrow! It amazes me how few people enter giveaways. This is your chance at free stuff! FYI, this link is only open for two days. If you are going to do a giveaway and want to feature it here, make sure you link it up sometime on Thursday or Friday.


Stay tuned for the next Categorically Crafting.


You know what to do. Enter your project (up to 4 links), tip, idea, recipe, whatever. Visit others. Leave comments. PLEASE NO ETSY SHOPS! Come back again in the next few days more projects are added throughout the week. Let the fun begin! (Because blogging is not my full-time job, I will not be able to visit every link. I apologize.)


Sunday, July 10, 2011

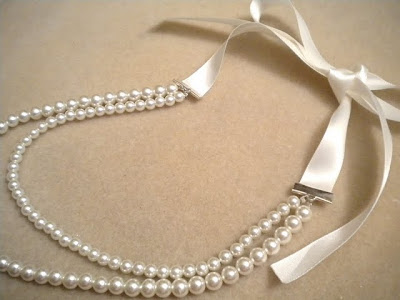
Pearl and Ribbon Necklace and a Giveaway From ME!!!

Pearls are romantic and never go out of style! I love how elegant they look with a solid colored dress or how they dress up a pair of jeans. This ribbon and pearl necklace by My Girlish Whims would certainly be a stunning accessory to any wardrobe or outfit!


See how to make the ribbon and pearl necklace.


Also, head over to Sassy Sites to win some great prizes this week. This awesome blog reached 2000 followers and is having a giveaway everyday for seven days from some of Marni's favorite blogs/bloggers. One of them is ME!!!! I'm giving away a bandana dress! Besides the great giveaways, there are some fabulous posts of full of greatly creative ideas! Go see Sassy Sites!

Saturday, July 2, 2011

Guest Blogger - Ginger Snap Crafts - Boutique Burp Clothes


I'm a wife to one awesome guy
& mom to 5 wild & crazy kiddos.
I love to create things, blog, garden, decorate
& most of all be with my family.

I've been blogging for almost 4 years,

& I love keeping a journal of my family,

but I thought our family blog was

getting a little overrun with all my craftiness.


So, I decided it was time to part ways

& start my very own craft blog,


Ginger Snap Crafts. :)

It's a place to share ideas I've found, &

inspire you to create along with me.


Since Michelle is having a new baby, I thought it'd be fun

to share something for all the little guys & gals out there.


Today I'm going to show you how

to make these {cute & easy} burp cloths.


Just letting you know, I don't sew!

So if I can make these anyone can!


I know Michelle is having a boy!

I made these for my sister, & she just had another little girl.

So, you'll have to excuse all the girl colors!


All you'll need is some ribbon, thread, cloth diapers & a sewing machine.

Lay out your cloth diaper and measure two ribbons a little longer that the diaper.

You can always trim these later on. These will be sewn along each seam of your diaper.


Pin your ribbon down along the seams of your cloth diaper to hold it in place.

Now to the fun part, you get to crank up your sewing machine!


You'll sew down one side, turn & then sew up the other side.

Trim your ribbon if you need to.


There you go! All done!

{How easy is that?}


Then fold them up & stack them on top of each other.

I used some extra ribbon to tie a bow around them.

Added a cute tag & that was it!

A {cute & easy} baby shower gift that you know will be used a bunch!


I'd love, love, love to have you stop by Ginger Snap Crafts.


Each week I have a super fun link party called

{wow me} wednesday.


Love to have you link up your fun projects & ideas.
You can also check out my blog for some more {cute & easy} projects.


Like these fun

{teacher appreciation gifts}


or my fun & festive
{4th of July blocks}


or check out my super cute
{bathroom rules sign}!


{Hope to see you soon!}


Thanks, Ginger! I have some burp clothes similar to those and they are darling, super absorbent and cover a lot of area in the case of spit ups! I love them. Take a look at Ginger Snap Crafts. You will like what you see.

Thursday, April 14, 2011

Hanging Bags

I can think of many uses for these cute little hanging bags from Sol De Eira! There are so many places to hang them - on cribs, stairs, railings, towel racks, etc. What a useful bag to have!


See the hanging bag tutorial in both English and Portuguese.


Photobucket


This post sponsored by Cash For Maternity.

Friday, April 1, 2011

Easter Bunny Hair Clips/Bows

Learn how to make some adorable bunny clips for Easter! Visit Ten Cow Chick to see the tutorial. She has many cute bow/clip tutorials on her blog!


Sunday, March 20, 2011

Guest Blogger - House of Hepworth - Duct Tape Decor!

.
Hey Someday Crafts readers! I'm so excited to be here today. I'm Allison and I blog at

House of Hepworths.

I hope you enjoy my fun project I've whipped up just for you guys!


I wanted a fun fresh project to share here at Someday Crafts. After playing around with a few ideas, I came up with...

Duct Tape accessories!

zeebraducttape02

Seriously, how fun are these? And I made them all with objects I had lying around my house and a little bit of printed Duct Tape.


I found this fun Duct Tape at the store and knew I had to incorporate it into a project.

zeebraducttape07

For the storage boxes, I found three identical shipping boxes. I taped the bottoms shut and cut off the top flaps.

zeebraducttape06

I started by adding the Duct Tape around the entire top of the box. I left enough to fold it over to create a finished edge.


zeebraducttape08

Once it's around the box, just fold it over the edge.

zeebraducttape09

After the top edge was folded I simply and easily wrapped the duct tape around each box. In total, it took 4 layers to cover the boxes.

zeebraducttape10

I wanted some fun accessories to go with the cute boxes for my daughter's shelf, so I searched my home and found this tissue box.

zeebraducttape11

The duck theme in their bathroom is getting retired soon, so I added Duct Tape to the tissue box as well.


zeebraducttape12

The top was a little tricky. I taped across the hole, then got a razor blade and cut little triangles around the hole and folded them all under the inside of the tissue box. Here's a picture of the inside of the box:

zeebraducttape05

My boxes were cute, but still a little boring, so I found some hot pink grosgrain ribbon and hot glued it around the top and bottom of each box. Then I tied some bows and glued them on as well.

zeebraducttape13


Now my daughter has some fun accessories for her bedroom!

zeebraducttape03

I was having so much fun taping everything in site, so I added some of the funky Duct Tape to a candle as well!

zeebraducttape01

I do want to mention though, this candle is strictly for decorative purposes ONLY. I will never burn it. If you attempt this project, do not burn the candle. The Duct Tape and ribbon are both extremely flammable!!


zeebraducttape04


Aren't they just so fun?! What little girl wouldn't want hot pink and zebra print accessories?

zeebraducttape02


My total cost was about $8.00. Each roll of Duct Tape is around $4.00 and this project took 2 rolls. All the other accessories, I already had on hand.


I'd love for you to stop by my blog and see some of the other fun crafts I've done! I also do lots of DIY projects, renovations, furniture updating, and house tweaking. Here's a sampling of what you will find at House of Hepworths:


My Painted Soap Pump and Knife Block have been a crowd pleaser.


My #1 most viewed project on my site are my cupcakes in cones. I'd love for you to stop by and see how I made them.


I recently painted and added tons of box moulding, chair rail, and window moulding to our Formal Living aka "piano" room.


I also gave a tutorial on how to add moulding to walls with rounded corners:


Perfectly square corners just waiting for your moulding! You can find out how I did it here.


If you like these projects, you'll love my blog. Just click the button below to check out all the fun!

HouseofHepworths

Thanks, Allison. I'm thinking I want some zebra stripes and hot pink ribbon for my bedroom now! I never knew Duct Tape was so cool until I saw this post. (I actually went to the nearest craft store and checked out the selection of printed tape and it was inspiring. I'm thinking up some new projects around the house!) House of Hepworths is a rocking hot blog. Plus, Allison is quite funny! Head over to House of Hepworths to become a follower.